![]() Today, businesses and teams are using project management to help improve the chances of achieving their desired result. PM standards exist to help project managers plan work, assign tasks, lead teams, track progress, monitor status, and communicate updates. Still, every company or team has a different and preferred way of getting work done. As a result, the PM software market is full of choices, including online tools. One of the most effective online project management tools is Basecamp.
Today, businesses and teams are using project management to help improve the chances of achieving their desired result. PM standards exist to help project managers plan work, assign tasks, lead teams, track progress, monitor status, and communicate updates. Still, every company or team has a different and preferred way of getting work done. As a result, the PM software market is full of choices, including online tools. One of the most effective online project management tools is Basecamp.
Third time’s a charm
Basecamp is a web-based project management and collaboration software. Moreover, Basecamp 3 is the third and latest iteration of the PM tool. It was re-designed from the ground up, and includes new features to make it as functional and as easy to use as possible. For example, it helps teams achieve their project’s desired result. It incorporates organization, access, workflow, and capabilities that support project management. In other words, Basecamp 3 helps increase the accountability of individuals and teams by making visible who is working on what. They can communicate more efficiently with a variety of collaboration tools without having to spend precious time on long meetings. Also, the inherent transparency of the platform keeps everyone on the same page.
Basecamp 3 Basic Tips and Tricks
Basecamp 3 is a business tool that becomes more effective when used correctly, consistently, and comprehensively. The good news is that it is simple to get started with, has an intuitive interface, and has its own onboarding guide.

1. Start with Getting Started
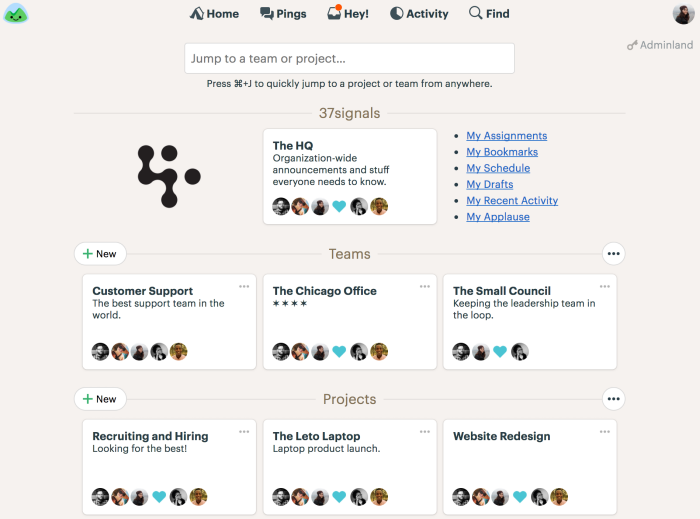
For newcomers, the best way to get the benefits of using Basecamp 3 is to spend a few minutes going over the Getting Started guide. It is a small time investment that will help users sail smoothly afterward. They will learn about the all-important Home Screen, how to personalize it with the company’s logo, and how to organize it through pinning, with number, grouping, and others.
2. Use the Tiered Approach
Basecamp 3 allows users to organize their company, their departments, and their work. It offers a tiered organizational approach with the following:
HQ – This level is best for company-wide communication.
Teams – This level is for specific teams who work together.
Projects – This level is the recommended workspace for individual projects that are assigned to specific teams.
3. Right Tools for the Right Job
Users who are just starting can begin with just the six core tools. With these, they can manage the project, track the tasks, and collaborate with the team. It is important, however, to know the difference between a project and a to-do. Projects are larger and include multiple tasks. In contrast, to-dos are usually simpler and single activities.
To-do Lists: This tool is for tracking tasks and assigning priorities.
Schedule: Good for tracking progress, deadlines, and milestones.
Docs & Files: This is for storing and sorting all types of files and documents.
Automated Check-in: Good for getting automatic updates, allowing users to specify what to ask, who to ask, and when to ask it.
Message Board: It is ideal for sharing announcements, updates, and key communication.
Campfire: Tool that is good for casual chat and quick discussions.
Ping: Best way to have a private 1-to-1 conversation.
Remember: Communicate fast and privately with Pings; fast and publicly with Campfires; and slow and publicly with Message Boards.
Advanced Basecamp Tips and Tricks for Pros
Many of Basecamp users are digital firms, marketing agencies, and professional services organizations. In fact, the PM tool has features geared for clients that make it easy to work with multiple projects from multiple customers.
1. Flip the Switch
Anything that users on Basecamp 3 can do with their team, they can also do with their clients. They can assign to-dos, share files and folders, chat, and more. However, everything in a project starts off as private only with the team. Once the user is ready to make the project visible to clients, they can simply click a setting to allow visibility to their clients.
2. Create a Template
Basecamp 3 allows users to create templates for work that they do over and over. For instance, they can create Schedule templates and To-do templates with dates relative to the start of their project. They can also manage them to view, edit, archive or delete. Users can even rename the tools that come with every project, or toggle them on or off.
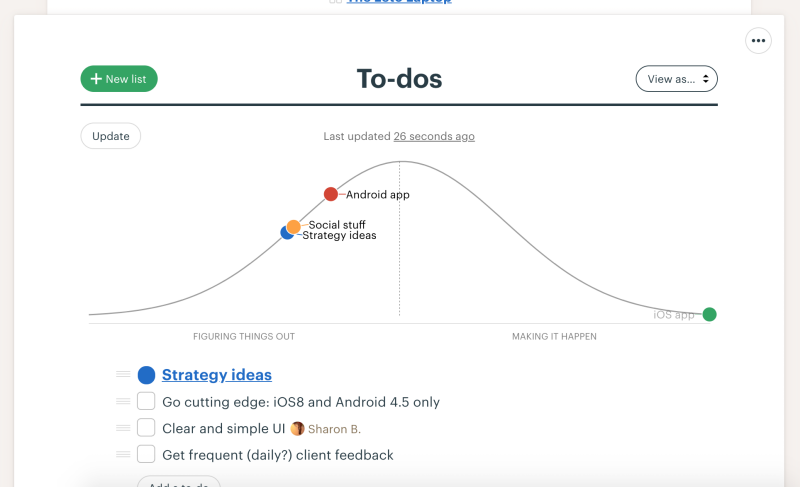
3. Read the Reports
Everything that the team enters will be available in reports. For instance, information includes all the latest activity, overdue to-dos, upcoming dates, to-dos added and completed, and more. A special type of report is the Hill Chart. As a matter of fact, Basecamp itself uses Hill Charts to track the progress of their to-do lists.
4. Customize Notifications
Basecamp 3 provides users some flexibility in how they want to be notified with work. For example, the Hey! menu is the nexus of all notifications. In addition, they have the option to get email notification also. They can temporarily disable them all, or set the hours that a user can be notified only. The use of @mention will also trigger a notification.
5. Take Advantage of Integrations
Basecamp has a good number of integrations with other productivity tools. Generally, they range from mobile and desktop apps, time tracking, invoicing, charts, reporting, and exporting tools. For a great reporting and exporting tool for Basecamp, we recommend you use our own tool Bridge24 for Basecamp.
Conclusion
Like any other business tool, Basecamp 3 has pros and cons. And as long as it is used in a correct and consistent manner, it can support teams and businesses in how they manage their projects successfully more often than not.
Leave A Comment